Your shopping cart is empty!
0


$0.00
0
$0.00

The VEX 123 is a great way to introduce students to coding! So, how do you code the VEX 123?
Method 1: Using the VEX 123 Robot
The VEX 123 Robot is a nice handheld puck size and the easiest way to code it is right on top of the 123 robots. So, if you take it and roll it across the surface, it lights up and makes a sound to indicate that it has turned on. Students can simply code right on top of it, hit the start button, and then the robot will do its thing. Then, if you want to start a new code, you simply shake it, and it will erase the code and you can start again.
To get started coding, it is very simple.
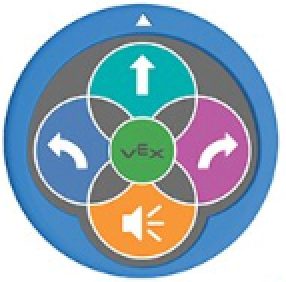
If we want to go forward three spaces, turn right, and go forward twice more before playing a sound, we will use the buttons on the top of the VEX 123 and press the following buttons in sequential order:


Now, we line it up on the field with the arrow facing the way that we want it to go, and then we hit the start button, which is the green VEX button in the middle.
Voila! Our robot is off and moving! To see it again, reset the robot where you want it to start, and press the green button again. If you want to restart the code, simply shake the robot to erase the code.
One thing that teachers frequently ask us about is: repeatability. And because of the way it’s designed and the small movements, it will continue to do the same code over and over and over.
Question: Do they run off batteries or are they plugged in?
Answer: They are USB-C and have an internal rechargeable battery. With the bundles, they come with a charging case and there is only one USB to plug in to charge all of the robots. The VEXcoder does require 2 AAA batteries. If you buy the bundles, it will come with the batteries and the screwdriver, but we do recommend changing those batteries about once per year.
Question: How long does the battery last?
Answer: The battery life is one full class day.
Question: How long can it be left on the charger?
Answer: It is a smart charger, so you can leave it on the charger until you’re ready to use it. When the robot is fully charged, the light turns from red to green.
Method 2: Using the VEXCoder + VEX 123 Robot
The second way to code is with the VEXcoder, which is a physical coder that is very durable - it is made of durable plastic and the coder pieces are made of plastic pieces too. So, it’s a great way to introduce students to block coding, because they can simply slide the pieces of code into the coder and press the play button to watch their code go. But it’s not just drive forward and turn left and turn right, the robot also has a down sensor and an eye sensor, so it does have the ability to drive until it sees an object, for example. We have different events, we have actions, we have sound, we have colour, and we get into some if statements too with the VEXcoder.
When using the VEXcoder, it’s recommended to leave the “When Start 123” in the VEXcoder at all times since it’s needed at the start of every coding project.
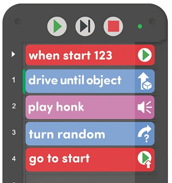
Each of the strips are pieces of plastic codes, which have individual lines of code on them, but they all also have symbols, too. So, if students don’t have the level of reading comprehension yet, they can simply look at the symbols to see what each piece of coding is going to do. If we want the robot to do the same actions as before, we will choose the following pieces of code to place into the VEXcoder:


Then, to start the robot, we press the play button on the VEXcoder.

You’ll see that it will light up each piece of code as it’s running. What’s great about the VEXcoder as well, is that there is a step-coder button.

This allows the students to step through their code one line at a time, and it will highlight which code will run next. This helps with troubleshooting where the coding may have gone wrong and where the code may need to be changed.
The VEXcoder does pair with the VEX 123 robot, so it is a great idea to label each of the robots with a label maker or sharpie with its respective VEXcoder as the same name so that you don’t need to pair them again every time you want to use them. If they do get mixed up, it’s not a big deal. They are easy to pair back up, but it would obviously, take a little extra time to get them all connected again if you have multiple in the classroom.
Questions: Is the coder connected via BlueTooth?
Answer: Yes!
Question: Do each of the robots come with their own VEXcoder?
Answer: Yes!
Method 3: Using VEXCode Software + VEX 123 Robot
The third way we can use the 123 is with VEXcode, which is a coding platform that VEX Robotics uses throughout its products. So, the idea is that students from as young as kindergarten or Grade 1 are learning to use the VEXcode and as they move through their schooling career and using the VEX products, the interface never changes; it just gets more powerful. VEXcode is based on Scratch, which many educators and many students are already familiar with.
The software for coding the robot is web based and is located at code123.vex.com.
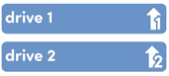
VEXcode 123 is as easy as dragging the coding pieces onto the project space. So, keeping with the same code as used above, the code in the VEXcode would look something like this:
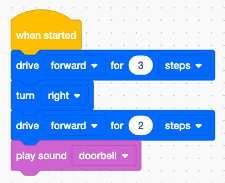
Note: One step is equal to one square, but this can be changed to different measurements such as mm, inches etc.
Connect the VEX 123 robot to the VEXcode by rolling the robot to turn it on, then clicking on the robot icon in the top right-hand corner and click Connect. You’ll see the names of the robots that you could connect, so if you’re in a classroom, you’re going to have a whole bunch of robots that will pop up. That is why it is going to be important to label your robots to keep them all straight. VEX Robotics also has an app that you can download on your phone to manage all of the robots. You can simply go onto the app and click on the robot that you want, and it will light up to indicate which robot you are connecting to. Then you can rename the robots, and if there are any firmware updates, it is just one click to update all the robots!
Once you’ve paired to the robot, it’ll tell you the battery life. Then you can click the start button and your 123 Robot will be off and running! Again, the code will be highlighted as the code runs through each of the individual lines of code.
VEXcode is the exact same platform for VEX GO, IQ, V5 etc. It is multi-language so if you want to teach in another language or English isn’t your students first language, you can switch between languages. There is also the ability to Save to your Device and Load from your Device so that students can revisit code that they were working on previously. Just remember that this isn’t saving the code to the robot, it is just saving the code the whatever device you are working on. . So, for Windows, it saves to your downloads folder, but it just saves it generically because there is no log ins. On ChromeBook or iPad, it saves to the cloud or to your google cloud.
Within the VEXcode, there are built -in tutorials. So, if you are teaching your students how to drive the robot, for example, there is a mini tutorial that can be opened, and students can follow along with it. There are also some example projects to help students and teachers get started. So, if you’re looking to learn about sensors, there is an example project called “Drive until Crash”. You can open it up and it will load into your project, so that when you click the start button, you can see what happens with the robot. Students can understand how the code works and then manipulate it to see what’s changed.
There are quite a few commands within the VEXcode software, which may seem overwhelming as a teacher for those students who may ask “what does this do?” and “what does that do?” Thankfully, there is a help menu. So, for any of the blocks that you or your students don’t know what it does, you can simply click on the block and in the help screen, it will give you a quick tutorial of what that line of coding is supposed to do and how to use that specific line of code.
Question: Are student accounts required?
Answer: No! There is no sign up required for students, so there is no log in or any place where students have to put in personal details. It is just a website for them to go. We haven’t had any issues with districts or schools in Canada or the US getting approved for these products.
Question: What type of sensors does it have and are there any other peripherals that can be added:
Answer: The VEX 123 does have an eye sensor (front sensor) and a down facing sensor to see lines. It also has a gyro, so that it can sense if it crashes. No, there are not any other peripherals. It was not designed to have anything plugged into it. That would be something designed for higher grades.
If you have any questions about how to use your VEX 123, please reach out to use. We'd be happy to help.
Related Products

Leave a Reply
Your email address cannot be published. Required fields are marked*


No comments